wangjinlong's blog


  • 首页

  • 关于

  • 标签

  • 分类

  • 归档

kiss原则

发表于 2021-01-20

kiss原则

KISS, an acronym for keep it simple, stupid, is a design principle noted by the U.S. Navy in 1960.

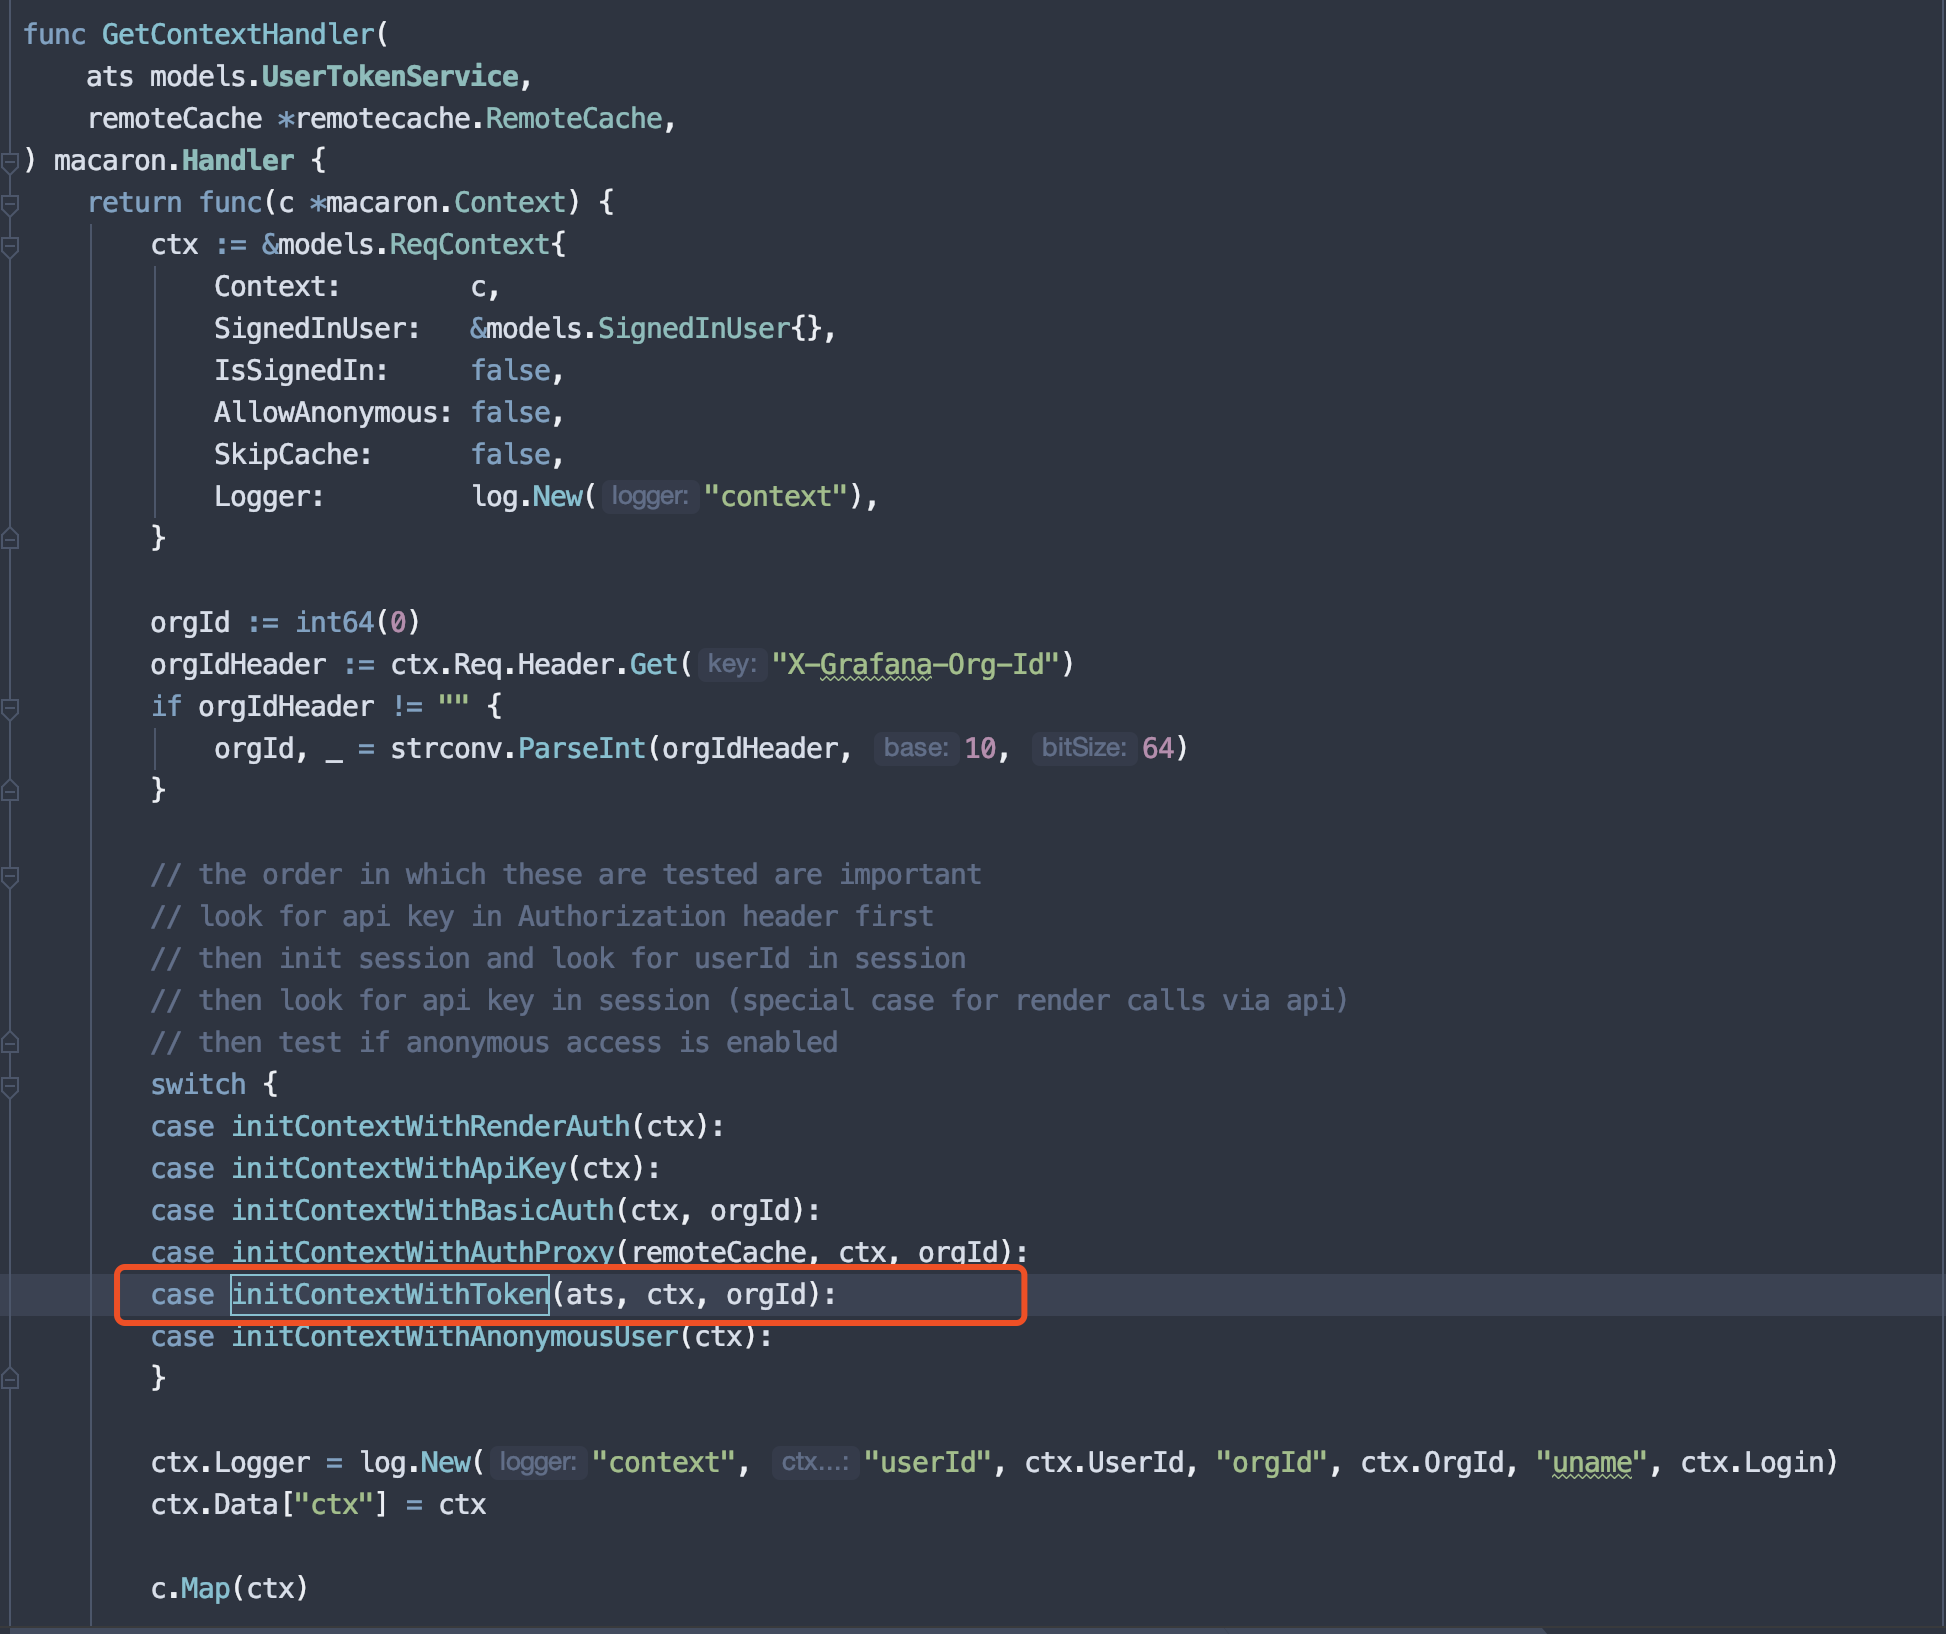
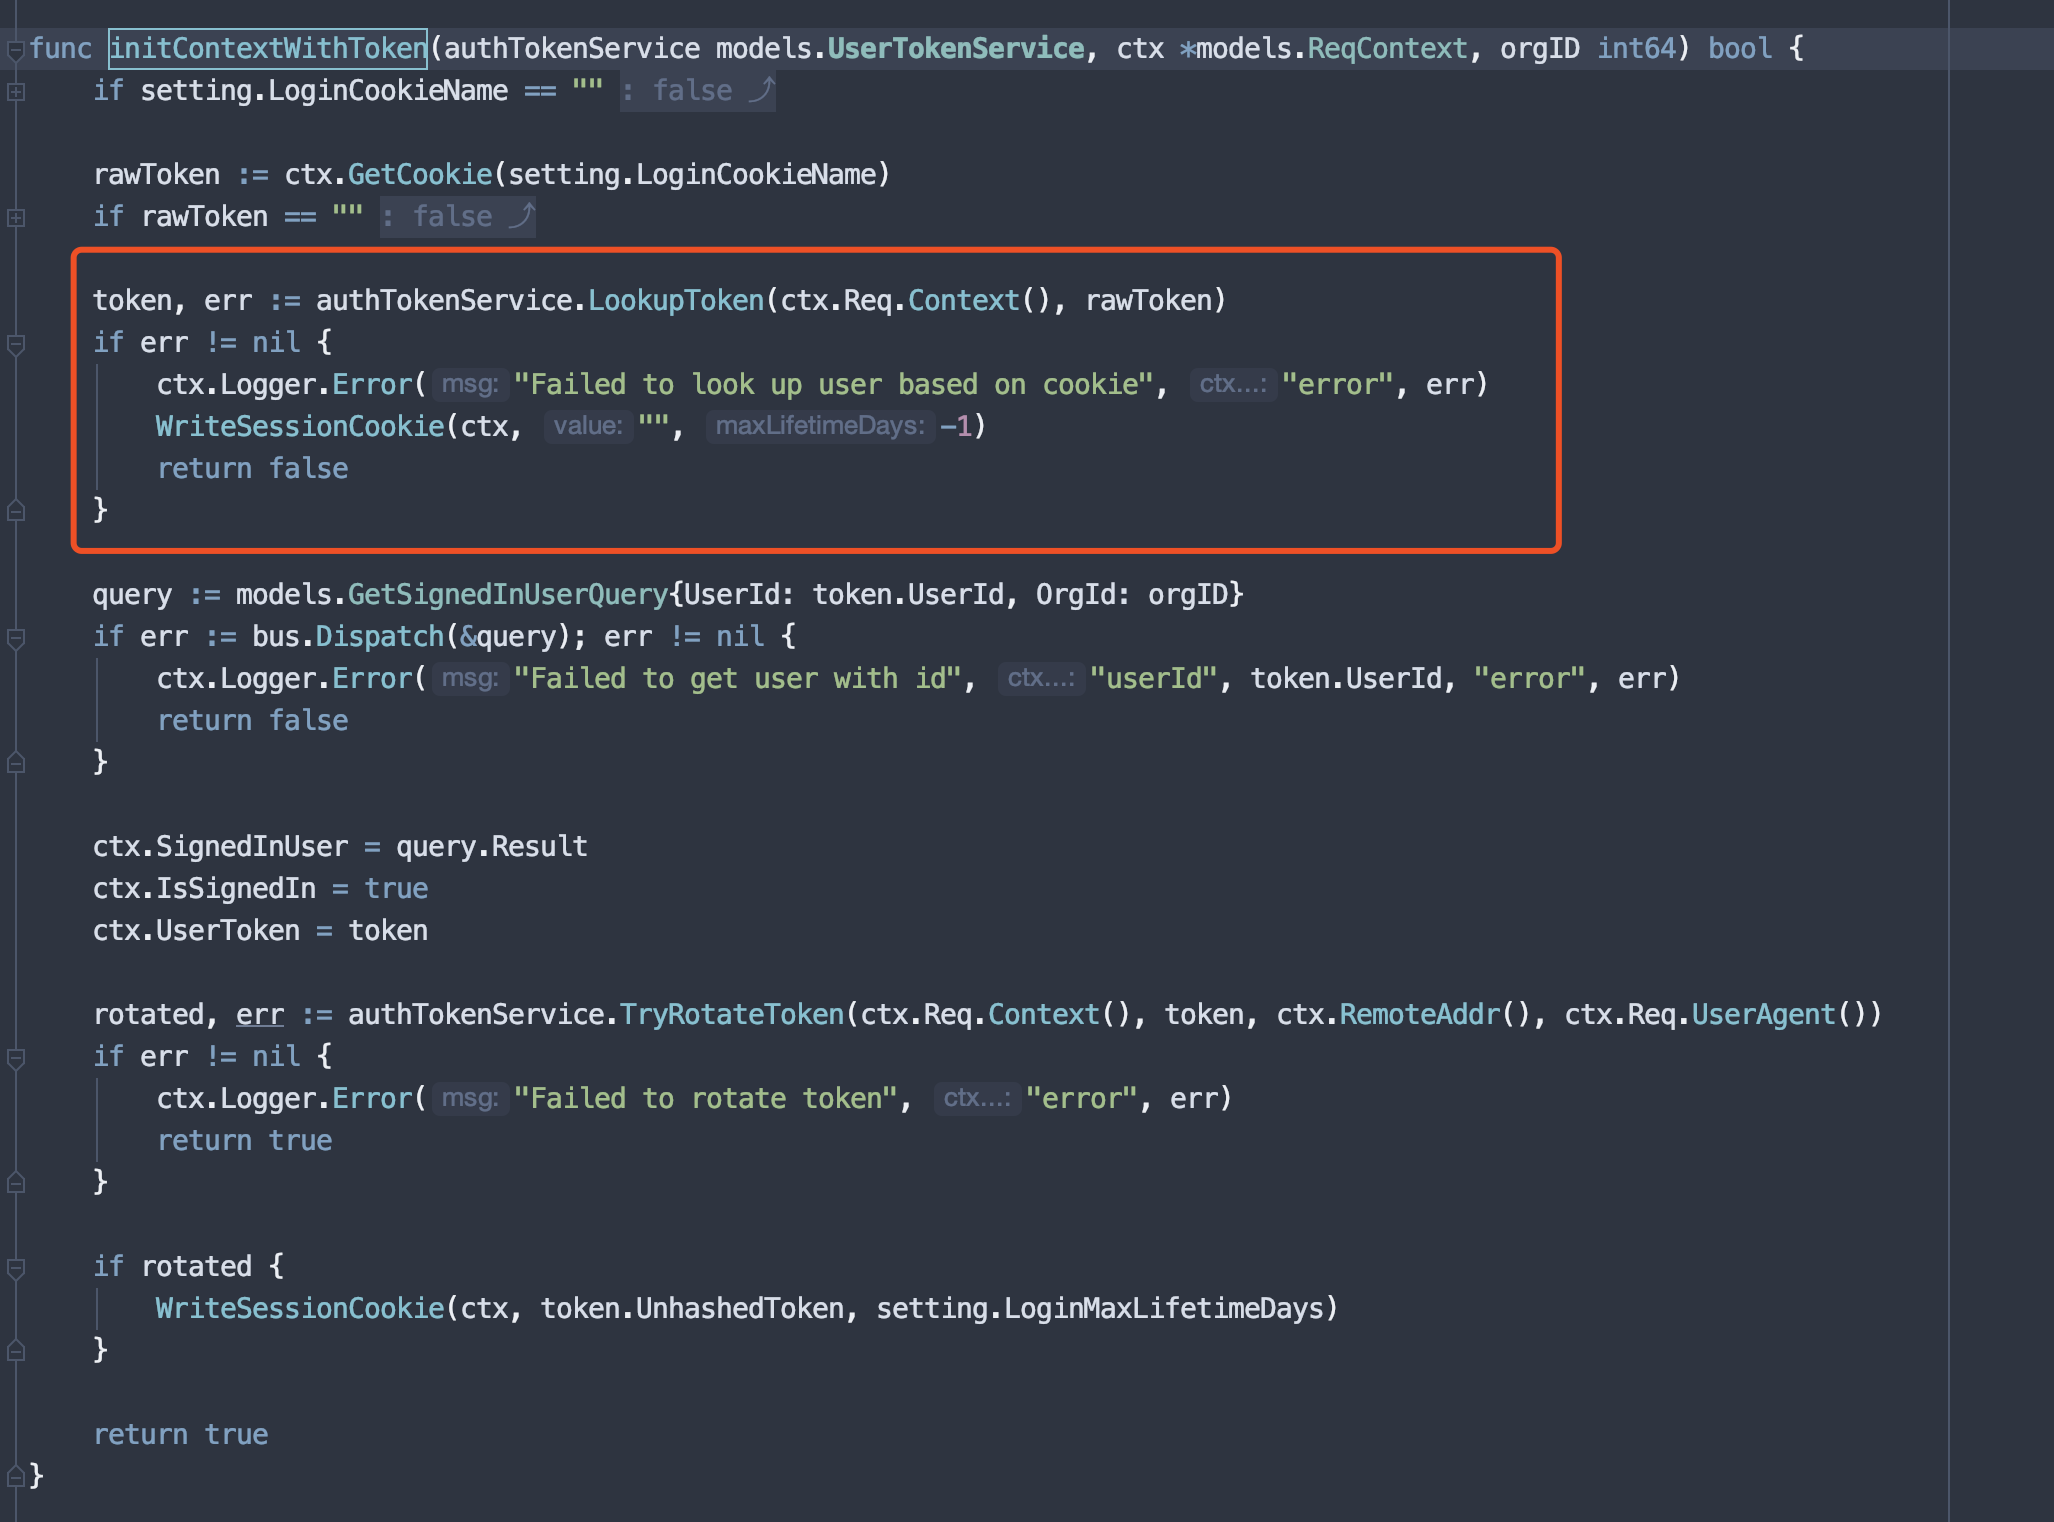
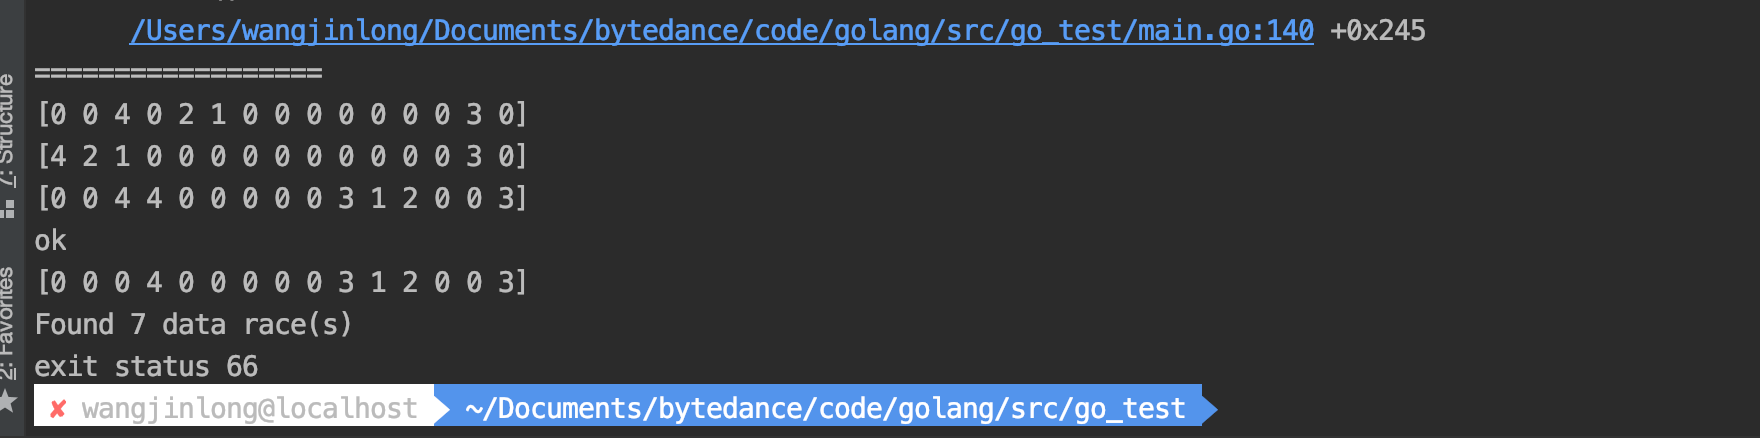
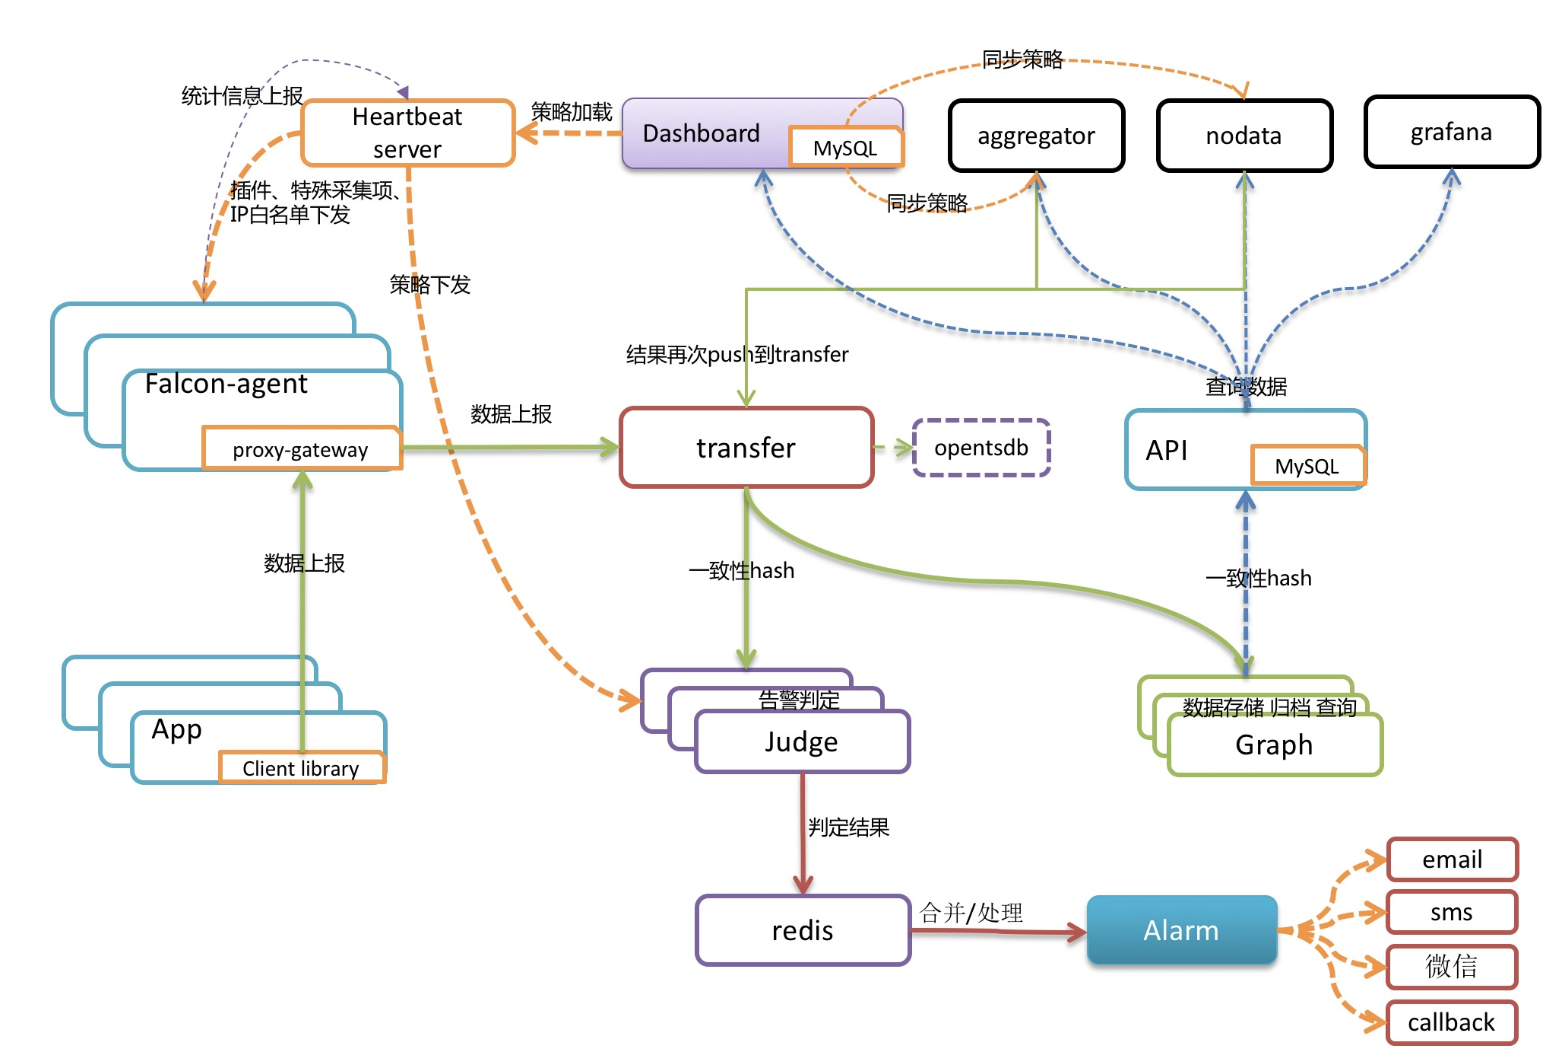
最近在生产环境大规模上量 VictoriaMetrics 作为监控后端时序存储,同时研习了一下VictoriaMetrics的代码;
不得不说, Valialkin大神的代码确实牛逼,具体代码和性能以后有时间会分享,这里主要看到文档中对kiss原则的一些描述,觉得非常到位

We are open to third-party pull requests provided they follow KISS design principle:

  1. Prefer simple code and architecture.
  2. Avoid complex abstractions.
  3. Avoid magic code and fancy algorithms.
  4. Avoid big external dependencies.
  5. Minimize the number of moving parts in the distributed system.
  6. Avoid automated decisions, which may hurt cluster availability, consistency or performance.

Adhering KISS principle simplifies the resulting code and architecture, so it can be reviewed, understood and verified by many people.

Due to KISS cluster version of VictoriaMetrics has no the following “features” popular in distributed computing world:

  1. Fragile gossip protocols. See failed attempt in Thanos.
  2. Hard-to-understand-and-implement-properly Paxos protocols.
  3. Complex replication schemes, which may go nuts in unforesseen edge cases. See replication docs for details.
  4. Automatic data reshuffling between storage nodes, which may hurt cluster performance and availability.
  5. Automatic cluster resizing, which may cost you a lot of money if improperly configured.
  6. Automatic discovering and addition of new nodes in the cluster, which may mix data between dev and prod clusters :)
  7. Automatic leader election, which may result in split brain disaster on network errors.

翻译

  1. 简单的代码和架构。
  2. 避免复杂的抽象。
  3. 避免魔改和花哨的算法。
  4. 避免大的外部依赖。
  5. 尽量减少分布式系统中组件的数量。
  6. 避免自动决策,这可能会损害群集可用性、一致性或性能

由于坚持kiss原则,VictoriaMetrics没有一些在其他分布式系统中流行的特性

  1. 脆弱的gossip协议, 可以参考Thanos中失败的尝试
  2. 难以理解和实现的paxos协议
  3. 复杂的副本方案,可能在边界条件下产生很多问题,副本方案
  4. 存储节点数据的自动reshuffling, 可能有损整个集群的性能和可用性
  5. 自动调整集群的大小(容量),如果配置不当,会花费过多的成本(资源?cpu, mem)
  6. 自动发现和自动向集群中添加新的节点, 可能会导致破坏pord数据(不太理解)
  7. 自动选主,在网络出问题的时候,会引起脑裂的灾难

###参考文档

VictoriaMetrics cluster verison

KISS

grafana 线上排查

发表于 2020-02-01

grafana 线上排查

现象

基于grafana v6.3.4魔改过的版本,在生产环境上,偶发大量的401错误,导致页面重定向到了登录页。

分析

现象还是比较明显的,通过分析grafana前端的代码,可以看到逻辑是之后后端接口返回401, 前端就会重定向到登录页面,那么后端什么情况向会产生401错误呢?通过分析整个部署的架构以及grafana后端的代码可以确定有这么几种情况

  1. 前端发请求的试试根本没有带grafana session
  2. 请求到达公司接入层nginx之后,nginx把session丢了
  3. 接入层没有丢, 但是自己的实例上那层nginx把session搞丢了
  4. 请求session打到了实例上,但是代码逻辑问题,导致没有通过session解析出用户ID,返回401
  5. 数据库问题导致,解析请求失败返回401

追踪

可能的情况大概就是这么几种。 最开始,我不太认为会是代码上的问题,所以一直把经历放在了2,3上。 主要是任务nginx这层会把session丢掉。
由于问题还是偶发的, 所以日志真的很难抓取到完整的链路,这里我也是跟了很久,才把整个链路的日志搞到,从而分析,排除了1,2,3

客户端

image

可以看到返回401时, grafana_session是带过去的,所以我们排除1

公司接入层&源站nginx

这块是最不好排查的, 因为这层的日志不在我自己手里,而且也不是全量采集的(可以理解,毕竟这个集群量太大了)。所以我直接把域名绑定到了源站的nginx ip上,如果还是出现问题,那么就可以排除2,接着排查3了。 让人失望的是, 问题真的依然出现了;我们在nginx日志的session打开,抓取到日志的情况是session还是带过来的
image

实例代码问题

问题困扰了我2周,还是频繁出现,而且在被迫添加了定时重启之后,还是会不定期的出现,由于我们的grafana支持着公司所有的业务,所以这个问题必须的尽快解决。没办法,只能再撸一下代码,看看到底会是哪里的问题。

image

grafana 用了这个中间件来判断用户登录的情况, 每个请求会一次执行switch中的几个方法判断,只要有一个满足,下面的逻辑就不执行了(这块代码值得借鉴);我们的代码主要走红框中的逻辑

image

跟到红框这里我又发现一些蛛丝马迹, 查看源站实例日志,再出现问题的时候确实发现了Failed to look up user based on cookie的日志

image

可以看到是在链接DB的时候报错了,当时第一反应肯定是DB有问题,导致连不上DB, 无法根据session解出用户ID;导致我又联系DBA,同事自己查看DB的监控,但是并没有看出当时的数据库有任何问题;

在仔细看上面的日志,发现端口后面是缺了的,最开始我认为的问题是日志库把日志截断了,但是看报connect: connection refused说明什么? 说明的是IP层是通的,真的是端口也就是进程层面不同,但是数据库的3306端口当时不可能有问题的,难道真的是端口错了吗? 可是端口是在实例初始化的时候,依赖consul服务发现解出来的,怎么会出错呢?

到这个时候,我已经开始怀疑是依赖的底层consul库有问题了,所有我进一步看了依赖库的代码逻辑。由于涉及到公司的底层代码,源码不方便贴出来,而且当时跟进到这一步之后,我没有发现明显的问题(有一处逻辑,当时大概会觉得有问题,但是我也没有做测试,所以当时没有再深入下去,最后的原因其实就是这里),线索到此又断了,抱着试一试的心态,只能去golang大群里请教群里的大神。

峰回路转的是, 真的有人遇到了同样的问题,并且提过fatal,经过群里的讨论, 问题终于清楚了!

image

模拟问题

源码不能贴,但是我写了测试代码, 实现大概是这个样子

image

通过go race 能看到在并发做rand.Shuffle操作的时候是存在race condition的

image

这导致的结果就是在并发 swap 的时候出现竞态,结果得到了一个 string 的 data 和另一个 string 的 length,最终出现日志中端口那段的字符串缺失,或者错误

总结

  1. 还是要相信日志
  2. 仔细,不放过任何的细节
  3. 对我自己来说,对于并发情况下,竞态的分析不够敏锐
  4. 总有大神比你牛逼

drf manytomany though

发表于 2020-02-01

drf manytomany though

models.py

假设有分组表和套餐表, 规划和套餐是多对多关系:即一个规划可以包含多个套餐,一个套餐可以属于多个分组;
典型的django manytomany关系, 通过through关联,以便存更多信息(比如数量)

1
2
3
4
5
6
7
8
9
10
11
12
13
14
15
16
17
18
19
20
21
22
23
24
25
26
27
28
29
30
31
32
33
34
35
36
37
class PlanGroup(models.Model):
"""
规划分组
"""
name = models.CharField(max_length=100, verbose_name="分组名称", unique=True)
product = models.ManyToManyField(Product, verbose_name=_('套餐'), through="PlanGroupProductRel")

class Meta:
verbose_name = "分组"
verbose_name_plural = "分组列表"


class Product(models.Model):
"""主机套餐(Product)"""
vendor = models.ForeignKey(Vendor, on_delete=models.PROTECT, verbose_name=_('供应商'))
name = models.CharField(max_length=64, default='', blank=True, verbose_name=_('名称'))
label = models.CharField(max_length=64, unique=True, verbose_name=_('标签')

class Meta:
verbose_name = _('SKU: 主机套餐')
verbose_name_plural = _('SKU: 主机套餐')

def __str__(self):
return self.label


class PlanGroupProductRel(models.Model):
"""
分组套餐多对多
"""
product = models.ForeignKey(Product, on_delete=models.CASCADE, verbose_name=_("套餐"), db_constraint=False)
plan_group = models.ForeignKey(PlanGroup, on_delete=models.CASCADE, verbose_name=_("分组"), db_constraint=False)
server_count = models.IntegerField(default=15)

class Meta:
verbose_name = "分组套餐"
verbose_name_plural = "分组套餐列表"

serializers.py

关键是serializers这里,有两点要注意

  1. 要重写creat,update方法,存储关联数据
  2. 关联的serializer类需要指定source=plangroupproductrel_set
1
2
3
4
5
6
7
8
9
10
11
12
13
14
15
16
17
18
19
20
21
22
23
24
25
26
27
28
29
30
31
32
33
34
35
class PlanGroupProductRelSerializer(serializers.ModelSerializer):
class Meta:
model = PlanGroupProductRel
fields = ("product", "server_count",)

class PlanGroupWriteSerializer(serializers.ModelSerializer):
switch_info = serializers.JSONField()
products = PlanGroupProductRelSerializer(source="plangroupproductrel_set", many=True)

class Meta:
model = PlanGroup
fields = (
"id", "products", "name", "rack_count", "switch_info", "aoc_count",)

@transaction.atomic
def create(self, validated_data):
products = validated_data.pop("plangroupproductrel_set")
plan_group = PlanGroup.objects.create(**validated_data)
for product in products:
PlanGroupProductRel.objects.create(product=product['product'], plan_group=plan_group,
server_count=product["server_count"])
return plan_group

@transaction.atomic
def update(self, instance, validated_data):
products = validated_data.pop("plangroupproductrel_set")
for item in validated_data:
if PlanGroup._meta.get_field(item):
setattr(instance, item, validated_data[item])
PlanGroupProductRel.objects.filter(plan_group=instance).delete()
for product in products:
PlanGroupProductRel.objects.create(product=product['product'], plan_group=instance,
server_count=product["server_count"])
instance.save()
return instance

views.py

view层就比较简单了, 执行用viewsets

1
2
3
4
5
6
7
8
9
10
11
12
13
14
class PlanGroupViewSet(DynamicTableFieldMixin, viewsets.ModelViewSet):
"""
A viewset for viewing and editing user ProductColor.
"""
queryset = PlanGroup.objects.all()
serializer_class = PlanGroupReadSerializer

def get_serializer_class(self, *args, **kwargs):
if self.action in ["list", "retrieve"]:
return PlanGroupReadSerializer
return PlanGroupWriteSerializer

def perform_create(self, serializer):
serializer.save(creator=self.request.user)

post数据

1
2
3
4
5
6
7
8
9
10
11
12
13
14
15
16
17
18
19
20
21
22
23
24
25
26
27
28
29
30
31
32
33
34
35
36
{
"name": "test_group_2222",
"products":[
{
"product": 26,
"server_count": 10
},
{
"product": 28,
"server_count": 15
}
],
"rack_count": 5,
"switch_info": {
"1": [
{
"name": "sw1",
"count": 20,
"is_main": true
},
{
"name": "sw2",
"count": 11,
"is_main": true
}
],
"2": [
{
"name": "sw1",
"count": 30,
"is_main": false
}
]
},
"aoc_count": 2
}

线上close wait问题分析

发表于 2020-01-31

线上close wait问题分析

现象

线上falcon集群告警所有的告警信息都没有发送出来,但整个绘图组件正常,所有监控项可查

分析

链路分析

falcon架构如下
image
出现上述情况时,如果对整个链路熟悉,其实可以很快定位到jadge, alarm, redis这三个组件的问题, 由于redis集群中根本没有出现告警的数据,所以问题肯定是在jadge上。

登录jadge的机器,执行ss | grep CLO | wc -l,会发现大量的close wait
image

close wait分析

大量的close wait打满了机器的链接,导致jadge已经不能work;那么问题就变成了,为什么机器上会有大量的close wait? 祭出经典的tcp状态转换图
image
image

CLOSE_WAIT:接收到FIN 之后,被动关闭的一方进入此状态。具体动作是接收到 FIN,同时发送 ACK。之所以叫 CLOSE_WAIT 可以理解为被动关闭的一方此时正在等待上层应用程序发出关闭连接指令。前面已经说过,TCP关闭是全双工过程,这里客户端执行了主动关闭,被动方服务器端接收到FIN 后也需要调用 close 关闭,这个 CLOSE_WAIT 就是处于这个状态,等待发送 FIN,发送了FIN 则进入 LAST_ACK 状态

其实就是当对端主动关闭的时候,自己这端会进入CLOSE_WAIT状态。

根据上面falcon的架构图,那jadge的对端显然就是transfer; 为什么transfer会主动关闭? 看代码
/open-falcon/falcon-plus/modules/transfer/sender/send_tasks.go
image

transfer自己搞了一个conn pool来做rpc调用,只要当rpc call超时或者返回错误的时候,transfer这端才会关闭链接。 所以看来还是到jadge的rpc 请求超时了或者出错了,其实第一步的时候,我们看jadge的日志,也已经能看出蛛丝马迹了;这个rpc call 为什么超时或出错,就只能查看jadge的代码了

jadge代码分析

/open-falcon/falcon-plus/modules/judge/rpc/rpc.go

image

这个rpc call的方法被修改过, 具体CheckNeedJudage 不太好展开了, 但归结的原因就是这个方法中由调用了rpc call,而且缓存失效,导致请求击穿,下游又被打爆,返回不回来

总结

线上问题分析

  1. 遇到问题不要慌,先拿出手机,发个朋友圈
  2. 看日志,各种日志, 从日志中找寻蛛丝马迹
  3. 看代码, 不要陷入细节, 看主要逻辑,链路
  4. 二分法调试,print大法

kubeadm搭建k8s集群

发表于 2019-05-10

master节点

关闭防火墙

1
2
systemctl disable firewalld.service 
systemctl stop firewalld.service

安装docker

添加docker源
sudo yum-config-manager --add-repo https://download.docker.com/linux/centos/docker-ce.repo

安装指定版本docker-ce
yum install -y --setopt=obsoletes=0 docker-ce-17.03.1.ce-1.el7.centos docker-ce-selinux-17.03.1.ce-1.el7.centos

安装kubeadm kubelet kubectl

1
2
3
4
5
6
7
cat>>/etc/yum.repos.d/kubrenetes.repo<<EOF
[kubernetes]
name=Kubernetes Repo
baseurl=https://mirrors.aliyun.com/kubernetes/yum/repos/kubernetes-el7-x86_64/
gpgcheck=0
gpgkey=https://mirrors.aliyun.com/kubernetes/yum/doc/yum-key.gpg
EOF

这里先添加aliyun的源

yum install -y kubelet kubeadm kubectl systemctl enable kubelet && systemctl start kubelet

安装kubelet,kubeadm,kubectl

注: 在node节点也许要安装上述程序

拉取镜像

国内环境需要单独拉取镜像

执行kubeadm config images list ,查看有哪些镜像
然后执行

1
for i in `kubeadm config images list`; do    imageName=${i#k8s.gcr.io/};   docker pull registry.aliyuncs.com/google_containers/$imageName;   docker tag registry.aliyuncs.com/google_containers/$imageName k8s.gcr.io/$imageName;   docker rmi registry.aliyuncs.com/google_containers/$imageName; done;

拉取所需镜像

设置主机名,hosts

1
2
hostnamectl --static set-hostname  k8s-master
hostnamectl --static set-hostname k8s-node-1
1
2
192.168.33.11 k8s-master
192.168.33.10 k8s-node-1

开始配置master节点

在master上执行

1
kubeadm init --kubernetes-version=v1.14.1 --apiserver-advertise-address=192.168.33.11 --pod-network-cidr=10.244.0.0/16 --ignore-preflight-errors=NumCPU

这一步的preflight check中会提示一些错误,按照提示解决即可,比如关闭swap, 执行swapoff -a

安装完成后的正确输出

1
2
3
4
5
6
7
8
9
10
11
12
13
14
15
16
o start using your cluster, you need to run the following as a regular user:

mkdir -p $HOME/.kube

▽
sudo cp -i /etc/kubernetes/admin.conf $HOME/.kube/config
sudo chown $(id -u):$(id -g) $HOME/.kube/config

You should now deploy a pod network to the cluster.
Run "kubectl apply -f [podnetwork].yaml" with one of the options listed at:
https://kubernetes.io/docs/concepts/cluster-administration/addons/

Then you can join any number of worker nodes by running the following on each as root:

kubeadm join 192.168.33.11:6443 --token 4wjdcu.rbbhnqo3v0u7wvnk \
--discovery-token-ca-cert-hash sha256:f91ad7efecc53b99556025ef4ed60c1a72697fd4fcd8ed8e4d30dc5e5f04ad68

安装pod网络

使用flannel安装pod网络
执行kubectl apply -f kube-flannel.yaml

检查

kubectl get nodes

安装woker节点

worker节点需要安装docker kubelet kubeadm kubectl
和master同理

加入node节点

1
kubeadm join 192.168.33.11:6443 --token wuys8z.b6c8f95c5ig7yuz0 --discovery-token-ca-cert-hash sha256:f91ad7efecc53b99556025ef4ed60c1a72697fd4fcd8ed8e4d30dc5e5f04ad68

注: token我看到的是23小时过期。在master上执行kubeadm token create 创建新的token

汽车之家为Open-Falcon贡献Windows监控

发表于 2018-12-06 | 分类于 articles

前言

小米Open-Falcon监控系统自2015年开源以来,以其灵活的数据采集,良好的性能表现,高效的告警策略等特性,赢得的众多互联网公司的青睐。
汽车之家也一直关注着Open-Falcon的发展,系统平台团队通过对Open-Falcon的二次开发,打造了汽车之家的监控系统。这套系统负责了汽车之家所有服务器基础监控,URL监控,日志监控等重要功能。作为公司基础系统,稳定高效的支撑了近万台服务器的监控,告警工作。

设计

初衷

汽车之家除Linux服务器外,还有很多业务运行在Windows机器上,所以对Windows服务器基础监控,IIS,SQL Server等Windows服务的监控也非常重要。但是Open-Falcon未全面覆盖Windows系统,没有官方的Windows Agent去做数据的采集。社区中开源的脚本都是通过计划任务的方式采集。而我们希望的是Open-Falcon在Windows下的Agent采集的逻辑和架构与Linux下保持一致,方便监控平台管理,控制Agent。

目标

我们的设计目标有以下几点:

  1. 可以服务的形式运行在Windows服务器上,不用配置计划任务
  2. 支持采集Windows服务器基础监控项
  3. 支持采集IIS,SQL Server的监控项采集
  4. 提供和Linux Agent一样的push数据接口,支持第三方push数据
  5. 与Linux Agent其他功能保持一致

基于以上几点我们自研了之家的Open-Falcon Windows Agent。

实现

代码架构

image

Windows-Agent的代码架构如上图所示。程序启动后,会启动5个线程。每个线程都会按照配置好的时间间隔定时采集所需信息。

  • basic thread 基础监控项采集线程,通过psutil这个跨平台的库,可以轻松获取操作系统进程和系统利用率等信息。

  • IIS thread IIS数据采集线程,通过winstats这个库,定时的采集IIS站点的连接数,IIS站点的cpu使用率等数据。

  • SQL Server thread SQL server数据采集线程,同样通过winstats, 获取到SQL Server内存和I/O相关数据。

  • status thread Agent自身状态线程。这一点和Linux Agent的功能一样, 定时向Hearbeat Server汇报自己Agent的状态。这样在我们的监控平台上就可以向管理Linux服务器一样的管理这些Windows服务器。

  • HTTP HTTP线程会开启一个HTTP服务提供push接口,和Linux Agent一样,用户可以选择通过该push接口,把自定义的数据push给Agent。方便第三方数据的接入。

数据的传输

Open-Falcon Linux下的Agent启动之后,会和transfer组件建立长连接,通过Transfer.Update这个RPC调用,把Agent采集到的监控数据传输给transfer,后面的事情就全部交由Open-Falcon处理。Agent自身状态的汇报也同样方式,通过Agent.ReportStatus这个RPC调用和Hearbeat Server交互,上报自身状态。在Windows下,我们要采用同样的方式和transfer组件,Hearbeat Server组件进行数据的传输,不同的是,Linux下的Agent是golang实现,可以方便的使用golang原生的JSONRpc处理RPC调用,而我们Windows下的Agent使用python开发, 所以我们自己实现了jsonrpc的client,来模拟Linux下的处理。保证我们的Agent行为和Linux下的Agent一致

如何变身Windows服务

Windows Agent通过pypiwin32这个库,把python代码变成了服务安装到了Windows服务器上。这个库怎么用呢?Demo如下:

1
2
3
4
5
6
7
8
9
10
11
12
13
14
15
16
17
18
19
20
21
22
23
24
25
class AppServerSvc(win32serviceutil.ServiceFramework):
_svc_name_ = "OpenFalconAgent"
_svc_display_name_ = "Open-Falcon Windows Agent"

def __init__(self, args):
win32serviceutil.ServiceFramework.__init__(self, args)
self.hWaitStop = win32event.CreateEvent(None, 0, 0, None)
socket.setdefaulttimeout(60)
self.isAlive = True

def SvcStop(self):
self.ReportServiceStatus(win32service.SERVICE_STOP_PENDING)
win32event.SetEvent(self.hWaitStop)
self.isAlive = False

def SvcDoRun(self):
servicemanager.LogMsg(servicemanager.EVENTLOG_INFORMATION_TYPE,
servicemanager.PYS_SERVICE_STARTED,
(self._svc_name_, ''))
self.isAlive = True
#do somethings
self.main()

if __name__ == '__main__':
win32serviceutil.HandleCommandLine(AppServerSvc)

首先要继承win32serviceutil.ServiceFramework这个类,然后分别实现构造方法,停止运行方法SvcStop, 以及启动方法SvcStop。最后在主方法中调用win32serviceutil.HandleCommandLine(AppServerSvc)。
就可以通过python agent.py install安装服务,python agent.py start启动服务,有兴趣的同学不妨可以自己试试。

配置文件

Windows Agent的配置文件也和Linux Agent一下保持一致,如果你熟悉了Linux下的配置,甚至可以直接copy到Windows服务器下。具体的配置解释如下

Basic config
key type descript
debug bool whether in debug mode or not
hostname string the same as OpenFalcon Linux Agent
ip string ip address
heartbeat dict details in the later of this file
transfer dict details in the later of this file
http dict details in the later of this file
collector dict details in the later of this file
ignore array the metrics you wanna ignore
Heartbeat config
key type descript
enabled bool whether enable send heartbeat to hbs
addr string ip adrress of hbs
interval int intervals between two heartbeat report
timeout int timeout
Transfer config
key type descript
enabled bool whether enable send data to transfer
addr dict of string ip adrresses of all transfer
interval int intervals between two heartbeat report
timeout int timeout
Http config
key type descript
enabled bool whether enable http api
listen string the port server listened on

安装

  • 克隆下代码库git clone git@github.com:AutohomeRadar/Windows-Agent.git
  • 安装依赖pip install -r requirements.txt
  • 修改配置文件cfg.json中的内容为自己的正确地址
  • python agent.py install安装Agent服务
  • python agent.py start启动agnet

实战

目前Windows Agent运行在汽车之家上千台Windows服务器下2年多时间,始终保持了稳定,可靠的数据采集,同时对资源的消耗也非常小。

下图为Agent作为服务运行

image

下图为Agent进程的消耗,由于我们内部的Agent监控项要比开源的版本多,所以内存占用大概有30M左右,开源版本的内存占用会小于这个数值

image

下图为采集到的IIS站点的cpu使用率监控数据

image

下图为SQL Server采集监控数据

image

开源

在公司的支持下,我们将代码以Apache许可证开源。目前Windows Agent组件已经被Open-Falcon社区收录,为更多Windows用户提供支持。

image

相关文档以及代码参见https://github.com/AutohomeRadar/Windows-Agent/

后续计划

我们计划下一步为Windows Agent加入更多的特性。例如对插件的支持,添加更丰富的监控项等。同时,汽车之家对Open-Falcon还做了很多的二次开发,比如告警的升级机制,多种维度的告警收敛,URL监控,网络监控等,并且已经应用到生产环境当中。以后我们也会把通用的组件开源,回馈社区。
同时也感谢小米,感谢Open-Falcon社区。

更多精彩技术文章,欢迎大家访问汽车之家系统平台团队博客http://autohomeops.corpautohome.com

简历请发送`autohomeops@autohome.com.cn`, 期待你的加入!

gunicorn源码分析:Master-Worker模式(2)

发表于 2018-09-01

gunicorn源码分析:Master-Worker模式(2)

worker代码

看一下worker类的实现

1
2
3
4
5
6
7
8
9
10
11
12
13
14
15
16
17
18
19
20
21
22
23
24
25
class Worker(object):

SIGNALS = map(
lambda x: getattr(signal, "SIG%s" % x),
"HUP QUIT INT TERM TTIN TTOU USR1".split()
)

def __init__(self, workerid, ppid, socket, app):
self.id = workerid # 顺序号1,2,3...
self.ppid = ppid. # 子进程的pid
fd, tmpname = tempfile.mkstemp()
self.tmp = os.fdopen(fd, "r+b")
self.tmpname = tmpname

# prevent inherientence
self.close_on_exec(socket)
self.close_on_exec(fd)

self.socket = socket
self.address = socket.getsockname()

self.app = app
self.alive = True

self.log = logging.getLogger(__name__)

gunicorn源码分析:Master-Worker模式

发表于 2018-09-01

gunicorn源码分析:Master-Worker模式

最近阅读了gunicron的源码。 gunicron的工作模式采用Master-Worker, 提前fork出配置文件中配置数量的worker进程(prefork),这些worker进程同事监听这master进程的一个socket. worker进程响应用户请求。master进程通过各种信号量管理者worker进程。整个实现非常的巧妙,很多细节值得学习。

我把代码回退到较早的一个版本的提交,主要想看清楚整个处理架构。
commit_id: ec301fd43d26207ff0dd9e06925882bc017dc866

文件结构

.
├── LICENSE
├── Manifest.in
├── README.rst
├── bin
│   ├── gunicorn  #程序入口
│   └── gunicorn_django # django_app
├── examples
│   └── test.py # test app符合wsgi协议
├── gunicorn # 核心目录
│   ├── __init__.py 
│   ├── arbiter.py  # master进程启动文件
│   ├── http
│   │   ├── __init__.py
│   │   ├── iostream.py
│   │   ├── request.py # 处理http请求
│   │   ├── response.py # 处理http请求
│   ├── util.py
│   ├── worker.py  # woker进程核心文件
└── setup.py

代码启动

1
2
arbiter = gunicorn.Arbiter((opts.host, opts.port), opts.workers, app)
arbiter.run()

构造Arbiter类,传入监听端口,worker数量,调用run方法启动。项目启动后能看到3个进程(设置worker数量为2)

1
2
3
501 75763 72171   0 Fri11PM ??         0:00.58 /System/Library/Frameworks/Python.framework/Versions/2.7/Resources/Python.app/Contents/MacOS/Python /Users/wangjinlong/Documents/jinlong/code/github/gunicorn/bin/gunicorn --workers=2 examples/test:app
501 75764 75763 0 Fri11PM ?? 0:00.11 /System/Library/Frameworks/Python.framework/Versions/2.7/Resources/Python.app/Contents/MacOS/Python /Users/wangjinlong/Documents/jinlong/code/github/gunicorn/bin/gunicorn --workers=2 examples/test:app
501 75765 75763 0 Fri11PM ?? 0:00.11 /System/Library/Frameworks/Python.framework/Versions/2.7/Resources/Python.app/Contents/MacOS/Python /Users/wangjinlong/Documents/jinlong/code/github/gunicorn/bin/gunicorn --workers=2 examples/test:app

可以看到两个75763fork出两个子进程75764和75765. 75763是master进程,
子进程为worker进程。

master类代码

类图

arbiter类图如下

image

构造函数

master类的构造方法如下:

1
2
3
4
5
6
7
8
9
10
11
12
13
14
15
16
17
18
19
20
21
22
23
24
25
26
27
class Arbiter(object):

LISTENER = None # 后面赋值为监听的地址和端口构造的socket对象(127.0.0.1:8000)
WORKERS = {}
PIPE = [] # 父子进程通过管道通讯?没看出来具体作用。知识点见: https://www.cnblogs.com/kunhu/p/3608109.html

# I love dyanmic languages
SIG_QUEUE = [] # 信号量队列
SIGNALS = map(
lambda x: getattr(signal, "SIG%s" % x),
"CHLD HUP QUIT INT TERM TTIN TTOU USR1 USR2 WINCH".split()
)
SIG_NAMES = dict(
(getattr(signal, name), name[3:].lower()) for name in dir(signal)
if name[:3] == "SIG" and name[3] != "_"
)

def __init__(self, address, num_workers, modname):
self.address = address # 地址 127.0.0.1:8080
self.num_workers = num_workers # woker数量,不用说了一版为cpu核数
self.modname = modname # app名字,app为符合wsgi协议的python web代码
self.timeout = 30 # 超时时间
self.reexec_pid = 0 # 子进程ID
self.pid = os.getpid() # master 进程ID
self.init_signals() # 初始化信号量对应操作
self.listen(self.address) # 构造socket对象,并把LISTENER赋值为这个对象
log.info("Booted Arbiter: %s" % os.getpid())

self.init_signals() 初始化了所有的信号量以及对应操作, master靠信号量来管理worker进程,例如:增加一个worker进程,杀死一个woker进程等等,具体代码如下:

1
2
3
4
5
6
7
def init_signals(self):
if self.PIPE:
map(lambda p: p.close(), self.PIPE)
self.PIPE = pair = os.pipe()
map(self.set_non_blocking, pair)
map(lambda p: fcntl.fcntl(p, fcntl.F_SETFD, fcntl.FD_CLOEXEC), pair)
map(lambda s: signal.signal(s, self.signal), self.SIGNALS)

self.PIPE 没搞清楚到底作用是什么?调试代码发现可能是为了在master进程中,有队PIPE写和读的操作。

self.listen 方法主要是构造了socket对象

重点看Arbiter类的run方法:

1
2
3
4
5
6
7
8
9
10
11
12
13
14
15
16
17
18
19
20
21
22
23
24
25
26
27
28
29
30
31
32
33
34
35
36
def run(self):
self.manage_workers()
while True:
try:
sig = self.SIG_QUEUE.pop(0) if len(self.SIG_QUEUE) else None
if sig is None:
self.sleep()
continue

if sig not in self.SIG_NAMES:
log.info("Ignoring unknown signal: %s" % sig)
continue

signame = self.SIG_NAMES.get(sig)
handler = getattr(self, "handle_%s" % signame, None)
if not handler:
log.error("Unhandled signal: %s" % signame)
continue
log.info("Handling signal: %s" % signame)
handler()

self.murder_workers()
self.reap_workers()
self.manage_workers()
except StopIteration:
break
except KeyboardInterrupt:
self.stop(False)
sys.exit(-1)
except Exception, e:
log.exception("Unhandled exception in main loop.")
self.stop(False)
sys.exit(-1)

log.info("Master is shutting down.")
self.stop()

self.manage_workers方法:

1
2
3
4
5
6
7
def manage_workers(self):
if len(self.WORKERS.keys()) < self.num_workers:
self.spawn_workers()

for pid, w in self.WORKERS.items():
if w.id >= self.num_workers:
self.kill_worker(pid, signal.SIGQUIT)

self.spawn_workers方法就可以看到fork worker的操作

1
2
3
4
5
6
7
8
9
10
11
12
13
14
15
16
17
18
19
20
21
22
23
24
25
26
def spawn_workers(self):
workers = set(w.id for w in self.WORKERS.values())
for i in range(self.num_workers):
if i in workers:
continue

worker = Worker(i, self.pid, self.LISTENER, self.modname)
pid = os.fork()
if pid != 0:
self.WORKERS[pid] = worker
continue

# Process Child
worker_pid = os.getpid()
try:
log.info("Worker %s booting" % worker_pid)
worker.run()
sys.exit(0)
except SystemExit:
raise
except:
log.exception("Exception in worker process.")
sys.exit(-1)
finally:
worker.tmp.close()
log.info("Worker %s exiting." % worker_pid)

go的内存管理(翻译)

发表于 2018-08-24

go的内存管理

inlfuxdb源码分析-写入分析(三)

发表于 2018-08-23

inlfuxdb源码分析-写入分析(三)

写TSM文件源码分析:
从单测用例 $GOPATH/influxdata/influxdb/tsdb/engine/tsm1/writer_test.go#TestTSMWriter_Write_Single开始跟代码

1
2
3
4
5
6
7
8
9
10
11
12
13
func TestTSMWriter_Write_Single(t *testing.T) {
//创建空文件夹,使用了ioutil.TempDir("", "tsm1-test”),会根据两个参数随机生成文件夹
dir := MustTempDir()
//函数运行完,删除该文件夹
defer os.RemoveAll(dir)
//调用ioutil.TempFile(dir, "tsm1test”),返回临时文件
f := MustTempFile(dir)
//构建TSMWriter对象, 所有关于tsm文件的写操作全由这个对象完成
w, err := tsm1.NewTSMWriter(f)
if err != nil {
t.Fatalf("unexpected error creating writer: %v", err)
}
. . .

我们来分析一下TSMWriter这个类

1
2
3
4
5
6
7
8
9
10
11
12
13
14
15
16
17
18
19
20
21
22
23
24
25
26
27
28
29
30
31
32
33
34
35
36
37
38
39
40
41
42
43
44
type tsmWriter struct {
wrapped io.Writer //这个不用说了, 任何实现了io.Writer接口的对象
w *bufio.Writer //Writer implements buffering for an io.Writer object,一个带buffering的io.Writer对象
index IndexWriter //索引数据,IndexWriter是一个接口, 具体的实现类为 directIndex见下文
n int64
}

writer.go#240
// directIndex is a simple in-memory index implementation for a TSM file. The full index
// must fit in memory.
type directIndex struct {
mu sync.RWMutex
size uint32
blocks map[string]*indexEntries
}
这个结构为了后面writeIndex准备

Reader.go#1342
type indexEntries struct {
Type byte
entries []IndexEntry
}

writer.go#172
type IndexEntry struct {
// The min and max time of all points stored in the block.
MinTime, MaxTime int64

// The absolute position in the file where this block is located.
Offset int64

// The size in bytes of the block in the file.
Size uint32
}


// NewTSMWriter returns a new TSMWriter writing to w.
func NewTSMWriter(w io.Writer) (TSMWriter, error) {
index := &directIndex{
blocks: map[string]*indexEntries{},
}

return &tsmWriter{wrapped: w, w: bufio.NewWriterSize(w, 1024*1024), index: index}, nil
}

看一下TSMWriter的write方法

// Write writes a new block containing key and values.
func (t *tsmWriter) Write(key string, values Values) error {
   //传入key和values,values对象我们后面再分析
   if len(key) > maxKeyLength {
      return ErrMaxKeyLengthExceeded
   }

   // Nothing to write
   if len(values) == 0 {
      return nil
   }

   // Write header only after we have some data to write.
   // 先写入头信息
   if t.n == 0 {
      if err := t.writeHeader(); err != nil {
         return err
      }
   }

   // 写入body信息,这里可以对照上文中给出的数据结构来看
   block, err := values.Encode(nil)
   if err != nil {
      return err
   }

   blockType, err := BlockType(block)
   if err != nil {
      return err
   }

   var checksum [crc32.Size]byte
   binary.BigEndian.PutUint32(checksum[:], crc32.ChecksumIEEE(block))

   _, err = t.w.Write(checksum[:])
   if err != nil {
      return err
   }

   n, err := t.w.Write(block)
   if err != nil {
      return err
   }
   n += len(checksum)

   // Record this block in index
   // 写入directIndex
   t.index.Add(key, blockType, values[0].UnixNano(), values[len(values)-1].UnixNano(), t.n, uint32(n))

   // Increment file position pointer
   t.n += int64(n)
   return nil
}


//t.index.Add方法具体实现
func (d *directIndex) Add(key string, blockType byte, minTime, maxTime int64, offset int64, size uint32) {
   d.mu.Lock()
   defer d.mu.Unlock()

   // d.block是 map[string]*indexEntries,最终大概的结构是
   // ex: key是cpu,{cpu: [{‘MinTime’: xxx, ‘MaxTime’,:xxx, ‘offset’: xxx, ’size’: xxx}], ‘mem’: ...}
   entries := d.blocks[key]
   if entries == nil {
      entries = &indexEntries{
         Type: blockType,
      }
      d.blocks[key] = entries
      // size of the key stored in the index
      d.size += uint32(2 + len(key))

      // size of the count of entries stored in the index
      d.size += indexCountSize
   }
   //entries []IndexEntry
   entries.entries = append(entries.entries, IndexEntry{
      MinTime: minTime,
      MaxTime: maxTime,
      Offset:  offset,
      Size:    size,
   })

   // size of the encoded index entry
   d.size += indexEntrySize
}

下面我们看看tsmWriter的writeIndex方法的实现

func (t *tsmWriter) WriteIndex() error {
   indexPos := t.n

   if t.index.KeyCount() == 0 {
      return ErrNoValues
   }

   // Write the index
   if _, err := t.index.WriteTo(t.w); err != nil {
      return err
   }

   var buf [8]byte
   binary.BigEndian.PutUint64(buf[:], uint64(indexPos))

   // Write the index index position
   _, err := t.w.Write(buf[:])
   return err
}

主要看t.index.WriteTo(t.w) 这个方法
要记住之前index的结构

image

type directIndex struct {
   mu     sync.RWMutex
   size   uint32
   blocks map[string]*indexEntries
}
这个结构为了后面writeIndex准备

Reader.go#1342
type indexEntries struct {
   Type    byte
   entries []IndexEntry
}

writer.go#172
type IndexEntry struct {
   // The min and max time of all points stored in the block.
   MinTime, MaxTime int64

   // The absolute position in the file where this block is located.
   Offset int64

   // The size in bytes of the block in the file.
   Size uint32
}
//把用到的几个对象放在上面,以便看的更清楚一些


func (d *directIndex) WriteTo(w io.Writer) (int64, error) {
   d.mu.RLock()
   defer d.mu.RUnlock()

   // Index blocks are writtens sorted by key
   // keys: [‘cpu’, ‘mem’, xxxx]
   keys := make([]string, 0, len(d.blocks))
   for k := range d.blocks {
      keys = append(keys, k)
   }
   // 字典排序
   sort.Strings(keys)

   var (
      n   int
      err error
      buf [5]byte
      N   int64
   )

   // For each key, individual entries are sorted by time
   for _, key := range keys {
      entries := d.blocks[key]

      if entries.Len() > maxIndexEntries {
         return N, fmt.Errorf("key '%s' exceeds max index entries: %d > %d", key, entries.Len(), maxIndexEntries)
      }
      sort.Sort(entries)
      //2字节的key len
      binary.BigEndian.PutUint16(buf[0:2], uint16(len(key)))
      //1字节的key Type
      buf[2] = entries.Type
      //2字节的内容长度
      binary.BigEndian.PutUint16(buf[3:5], uint16(entries.Len()))

      // Append the key length and key
      if n, err = w.Write(buf[0:2]); err != nil {
         return int64(n) + N, fmt.Errorf("write: writer key length error: %v", err)
      }
      N += int64(n)

      if n, err = io.WriteString(w, key); err != nil {
         return int64(n) + N, fmt.Errorf("write: writer key error: %v", err)
      }
      N += int64(n)

      // Append the block type and count
      if n, err = w.Write(buf[2:5]); err != nil {
         return int64(n) + N, fmt.Errorf("write: writer block type and count error: %v", err)
      }
      N += int64(n)

      // Append each index entry for all blocks for this key
      var n64 int64
      //在主要看这个方法
      if n64, err = entries.WriteTo(w); err != nil {
         return n64 + N, fmt.Errorf("write: writer entries error: %v", err)
      }
      N += n64

   }
   return N, nil
}


func (a *indexEntries) WriteTo(w io.Writer) (total int64, err error) {
   var buf [indexEntrySize]byte
   var n int

   for _, entry := range a.entries {
      entry.AppendTo(buf[:])
      n, err = w.Write(buf[:])
      total += int64(n)
      if err != nil {
         return total, err
      }
   }

   return total, nil
}

func (e *IndexEntry) AppendTo(b []byte) []byte {
   if len(b) < indexEntrySize {
      if cap(b) < indexEntrySize {
         b = make([]byte, indexEntrySize)
      } else {
         b = b[:indexEntrySize]
      }
   }

   binary.BigEndian.PutUint64(b[:8], uint64(e.MinTime))
   binary.BigEndian.PutUint64(b[8:16], uint64(e.MaxTime))
   binary.BigEndian.PutUint64(b[16:24], uint64(e.Offset))
   binary.BigEndian.PutUint32(b[24:28], uint32(e.Size))

   return b
}

至此写入数据已经完成,我们可以查看tsm产生的文件

12…4
jinlong

jinlong

Simple is better than complex

36 日志
1 分类
15 标签
GitHub E-Mail
Links
  • Title
© 2021 jinlong
由 Hexo 强力驱动
|
主题 — NexT.Pisces v5.1.4